¶ Tools
¶ Git
Git is a version control program that allows multiple people to work on the same project without them interfering (directly) with eachothers. The logic is that there is a main version of the source code (a main branch), and any additions based of the main version are made in parallel branches. This usually reflect the workflow where for each new feature/bugfix or other adjustment has their own branch, where upon development is made and is later merged back to the main branch.
¶ Basics
The version control of a project is usually stored on a remote server like github in our case. To get a fresh git environment from an existing project (with git already configured), the command git clone [url] is used. This will download the project from the main branch along with any parallel branches as well (and its whole history).
When you have cloned the git project you will be on the main branch by default. To change to any other branches that exist use the command git checkout [branch]. If you wish to create a new branch use instead the command git checkout -b [branch], this will create a new branch locally on your machine.
To upload any changes you make on your branch use the command git push origin [branch], this will create a remote branch if it doesn't exist. NEVER push directly to the main branch, we'd like to keep main as a functional version as possible and any changes made to it should be reviewed by another person. Exceptions to this is trivial changes to non logic files, such as text files, altough do not spam such small changes. If the remote branch is ahead of yours, as in additions have been made to it by someone else, the push will fail and the difference between the remote and local branch needs to be fixed.
If the version of a branch is ahead of the version you have locally, you can use the git pull origin [branch]. If the branches differs, there will be a merge done see Merging below.
¶ Additions (commits)
To see what branch you're currently on use the command git status, it will also show if you're ahead or behind the remote branch and any files you have changed from previous version. To get to see previous additions, so called commits, in the branch (and other branches it is based upon) use the command git log. It will tell who made the changes, when, a small description of what the change encompasses and a unique id for the commit.
To make an addition, or a commit as it is called, first select which files that have been modified that should be staged for the commit. This is done simply with the command git add [files/folders], which also allows the use of '*' wildcards. To see which files are staged for the commit, use git status. Note: there may be configuration files or build files that can be accidentally added, which is not desired to keep in the remote branch with multiple collaborators. To avoid this you can add any folders or files that should be ignored in the file .gitignore. The build folder is already ignored for example.
After the files have been staged for a commit you can actually commit them, actually making the addition, with the command git commit -m [message]. The message should be descriptive of what the changes you have made encompasses. The commit is only made local, and to upload the changes use the command git push origin [branch]. NEVER push directly to the main branch.
¶ Merging
If the remote branch is ahead of yours or you'd like to include additions made in a branch to another branch, then you can do a merge. Merging will try to add changes made from both branches but there are cases where a file is changed differently from different additions. In this case you will have a merge conflict and will have to fix those for a successful merge. The merge conflict is clearly highlighted directly in the source files on the lines that are conflicting, there will be two versions of additions there. You have to either remove one of those, add both version changes or adapt the conflicting area to correctly incorporate both additions.
If a remote branch is ahead then git pull origin [branch] will automatically perform a merge. To perform a merge between local branches the command git merge [branch] will do the same magic. It will merge the branch stated in the command to your branch that you are currently on.
Any merge has to be commited, se above, and is done almost automatically for a merge without merge conflicts. For merge conflicts however the changes have to be staged and committed manually.
If you wish to merge in your branch into the main branch, you can do so with a pull request directly on the remote repository. See below.
¶ GitHub
The remote repository we use for the source codes is GitHub. To be able to access the remote repository on GitHub you have to have a github account and be manually added to the repository.
You can access the files directly on the GitHub websites and make small additions, such as changes to the README.md file, although it is highly recommended to do those changes locally. It is generally a good place to get an overview of what is currently being worked on and progress made to the project.
GitHub have several features, but one important one that will be used is the creation of pull requests. A pull request is a request to merge in a branch into main (other branches works as well I guess). This is generally done when a feature or fix is done. Then another collaborator can review the changes that are made and request any changes, via comments, if they see issues with the changes. Once a reviewer have approved of a pull request the changes can be merged into main.
¶ VSCode
The development environment is recommended to be done in Visual Studio Code to allow personal flexibility. You are however free to use other development environments if you wish. VSCode offers a (potential) light-weight environment with broad selection of extensions that eases development.
Recommended extensions are as follows:
- C/C++
- Python
- CMake
- Clang-Format
- STM32CubeIDE for Visual Studio Code
¶ STM32CubeMx
STM32CubeMx is an application that allows the configuration of the STM32 family of microprocessors (in our case STM32f411 CEU6). The configuration will generate a Hardware abstraction layer (HAL) that will manage some lowlevel logic such as I²C communication. The generation may mess with some CMake structure, so try to revert those changes if any configuration has to be done.
To see the current configuration and possibly change it, open the file phobos-hal/phobos-fc3.ioc in STM32CubeMX.
¶ STM32CubeCTL
STM32CubeCTL is a toolset that includes compiler, debugger and programmer (that allows transfer of executable to the microprocessor). The compiler in question is arm-none-abi-gcc and is required to be able to compile the flight computer. The compilation steps are done through CMake, see below. The install to the flight computer is made with the programmer STM32CubeProgrammer (in CLI it is STM32_Programmer_CLI), the flight computer should be connected with ST-link cable and be ON.
¶ Python
Python is a high-level programming language that focuses on code readability and ease of use. It is one of the most popular programming language and has a wide variety of usable modules that can be easily installed using pip. It is due to the simplicity of python and its wide range of modules that the wireless communication client is developed in it.
Python is also an interpreted language meaning that the python code is converted to a bytecode that contains the instructions and that is then executed by the Python Virtual Machine. It is important to note that the execution is done line by line, which is an inhibitor for optimization and therefor python code will be slower than compile code.
Python is a dynamically-typed language, basically meaning that a variables type doesn't have to be explicitly declared and doesn't have to be known until runtime. This allows a slight flexibility and eases development as one doesn't always have to think about what type a variable is.
Python also have a garbage collector for memory management, which eases development in such away that memory allocation/deallocation doesn't have to be a concern (until out of memory).
¶ pyserial
The wireless communication client makes use of one important python module called pyserial. It allows an easy communication to the LoRa dongle which is connected via USB.
¶ C++
C++ is a high-level programming language built as an extension to C. C++ compared to C adds object-oriented features (classes), functional programming and templates. C++ also comes with a standard library (STL) that implements commonly used functionality such as reading/writing to file and common data structures/algorithms. The standard library is quite minimalistic and third-party libraries have to be used if other features are required.
C++ is a compiled language meaning that the source code has to be converted to a machine code (binary) before it can be executed by the machine. The compiler is quite a complex bit of software and tries to optimize the source code you have written, making C++ a quite fast language execution wise. Compilation can take quite some time for larger projects, and can be frustrating to incrementally test source code when it has to be recompiled each time.
C++ compiler reads files from top to bottom. So if there are any variables used they have to be declared/defined above where they are used. Preprocessors, see below, eases/(complicates) this slightly.
Usually in C++ (and C) the source code is seperated in two files: header files '.h' and cpp files '.cpp'. Header files contains declarations of variables, functions, classes, etc... that will basically notify the compiler of things that exist. The variables, functions, classes, etc... is later defined in cpp files, where the actual implementation of logic is defined. The header acts a sort of interface for any other source code file that wish to use the underlying logic. The command to include such a interface is #include "[header_file]" which basically copies the content of the file and pastes it in the line using a preprocessor (used by the compiler), more on this below.
C++ is a statically-typed meaning that each variable type is known at compile time, it is known before it is actually executed. The compiler will thus find any type errors and general syntax errors at compile-time. Some primitive types that are frequently used are:
- char: A byte that usually represents a character, e.g. 'A'
- int: 16-32 bit integer, length varies depending on underlying architecture
- float: 32 bit floating number
- double: 64 bit floating number
- bool: boolean number, true or false
- void: Absence of value, nothing basically
A modifier called signed or unsigned can be used to allow/disallow a primitive data type to take negative values, which will effect the value range and arithmetic. All types are implicitly signed.
Since int is different depending on architecture, it is better to use int types from the STL (they are also already signed/unsigned):
- int8_t: 8 bit integer that is signed
- int16_t: 16 bit integer that is signed
- int32_t: 32 bit integer that is signed
- int64_t: 64 bit integer that is signed
- uint8_t: 8 bit integer that is usigned
- uint16_t: 16 bit integer that is unsigned
- uint32_t: 32 bit integer that is unsigned
- uint64_t: 64 bit integer that is unsigned
If a variable shouldn't be allowed to changed, it is then a constant. These can be declared using the modifier const which won't allow any changes to the value, the compiler will complain.
To contain a set of code, you can encase it in a namespace using keyword namespace [name] {} with the contained code within the bracket. To then access the content within a namespace, use the seperator ::, e.g. namespace_name::function1();. A common namespace is std, which is in almost all STL code. If a namespace is used frequently and doesn't conflict with other declared variable names and such, you can use using namespace [name] which will allow to access the elements within the namespace directly.
Types can be user defined using classes/structs and other structures. There is also possibility to using aliases for types to ease readability.
A class is declared with keyword class followed by name and is then encased in a {};. To define visibility of the members of the class everything below public: will be publicly accessable and for private: everything will be only accessable within the class. A class is created by calling a constructor, which is declared with the same name as the class within the class ClassName();. When an object is destroyed, either goes out of scope or is manually removed, a destructor is called. The destructor is declared as ~ClassName(). If no logic is done by the constructor or destructor they don't have to be explicitly declared.
A class acts like a sort of namespace and to define the elements of the class (such as the actual logic) the namespace seperator has to be used. If the class is defined in a header file and then implemented in a cpp file, then in the cpp file ClassName::function() {} notation will have to be used. To intialize the member variables in a class an intializer list is used in the constructor which is denoted as ClassName::ClassName() : member_variable1{value1}, member_variable2{value2} {}. Everything after ':' is the initializer list except for the {} which is the constructor body. The intializer list especially important for references, see below, as they have to be assigned a value during creation.
A class is a type, and when constructed is an object. Each object keeps track of their own variables, but sometimes they might want shared variables or a function wish to be called without creating an object. Then the static modifier is used, which will basically stitch the function/variable to the class and can be accessed with namespace seperator outside without an object.
It is possible to declare and assign an array of objects. The length of array has to be known during compile time unless dynamic memory allocation is used. An array is denoted by [n], where n is the number of elements, preceded by type e.g. double[3]. The number of elements can be omitted if it is defined during declaration e.g. double[] arr = {4, 9, 3};. It is then understood by the compiler how long the array is, and the length can be retrieved with the sizeof() operator. Access of an array element is done simply by [i] operator, where i is the index (starting from 0!). For example arr[1] would give the value 9.
One of the more unfamiliar aspects of C++ is the use of pointers. A pointer is an address (in memory) to an object of a certain type. A pointer is denoted by a * preceded by a type e.g. char* is an address for a char type, it points to a char. Pointers is an address, to access the content of the address the dereference operator * has to be used (same character, different purpose). Say we have an int* number; to change the value of the address (once it has been assigned a memory address) you do *number = 42;. If you have a user-defined object that has a pointer to it and you wish to access its elements, you can use -> directly instead of first dereferencing the pointer and then access the elements. If a pointer doesn't address an existing object and you try to access it, there will be undefined behavior and probably a crash. So ALWAYS make sure that the pointer you use points to a real object. Usually if a pointer doesn't point to an existing object it is a nullptr, which empty pointers are usually assigned when not in use.
Another modifier that is closely related to pointers are references. A reference, as it says, references another already existing object. A reference is safer than a pointer as it requires an existing object, and is not assigned a nullptr (ofcourse you can always do sketchy things to ruin this safe haven). The reference is denoted by a & preceded by a type e.g. float& and always have to be assigned a value during declaration. The reference doesn't have to be dereferenced like pointers and acts like normal objects.
Every object has an address (including pointers), and this address can be accessed with the reference operator & that does the opposite of the dereference operator *. Say you have a bool can_be_referenced{true};, then the address of it is &can_be_referenced. Addresses can be manipulated by arithmetic, and in reality arrays are just pointers with each next address being the next element in the array. An array is then (almost) equivalent with a pointer: int[] == int* the exception being that the length of an array is often explicitly known. A string of characters can thus be declared as char*, which is called a C string as it is frequently used in C.
In C++ you have to keep track of allocations of data as it isn't automatically removed when it goes out of scope (as in not accessible). When allocating new data you use the new keyword and to remove data the remove keyword is used with the variable in questions. If the data is an array of data then remove[] should be used instead. Always keep in mind to remove any data that is allocated with new or there will be a memory leak that will eventually stall the software.
The c++ compiler contains a preprocessor that changes the source code before it is compiled. Preprocessors commands starts with # and can be used in many ways, altough this makes code harder to read so should be used sparingly. One preprocessor we have already seen #include which includes basically pastes in a file in the source code. Other commonly used preprocessor is to define something with #define [definition]. To check if something is defined, #ifdef [definition], #ifndef [definition] followed by #endif is used which will include block of code if a defintiion is defined/not defined. These are usually used as header guards in header files. A header guard make sure that a header is only included once, otherwise the same declaration would be copied in multiple times (unecessary) and if there are any defintions there will be a compiler error.
¶ FatFs
A library called FatFs is used for writing/reading to files in a FAT32 filesystem. This is needed to read/write files to the SD card instead of writing/reading directly raw in the memory blocks. FatFs keeps track of the filesystem, such as folders, file creation etc... while we implement the logic to write to memory blocks on the SD card (via SPI commands). Documentation of FatFs can be found here:
https://elm-chan.org/fsw/ff/
¶ Google C++ Style
There are many ways to write c++ code aesthetically, but to keep things consistent with a focus on readability, the google c++ style is used. There is a whole document covering it:
https://google.github.io/styleguide/cppguide.html
The documentation could be a good read for the one experienced, but isn't a requirement. Instead it can be summarized shortly:
- Keep variable/function names descriptive. Don't be afraid of long names (too long is hard to read), they are often selfdocumented. Exceptions of this can be abstract logic (like algorithms), but that needs to be explained in more depth in comments.
- Variables should be in snake_case: Each word is seperated by '_' and all characters are lowercase.
- Types (classes and such) should be in PascalCase: Each word starts with a capital letter.
Functions should also be in PascalCase, altough camelCase would make it different from types, and have mostly been used.
NOTE: Decided to divert and use camelCase for functions instead of PascalCase- Constant Variables should be in PascalCase with a preceeding 'k', e.g.
kConstVariable. - Functions should be short, it will be easier to read and make code more resuable.
- Private variables should end with a '_' to make it clear they are private. e.g.
private_variable_
¶ clang-format
Clang-format is a tool that formats code so that it keeps a somewhat coherent format throughout the repository. Generally it automatically idents lines and breaks down long lines of code into several. There is a configuration file on how clang-format should format the code, in the repo it's in the file .clang-format. Clang-format can be accessed through the toolchain Clang (which also comes with it's own c++ compiler which we will not use). The VSCode extension Clang-Format can be used to make the formatting easier and can be configured to format each time a file is saved.
¶ CMake
CMake is a build system that eases the compilation of the code into an executable file, library or other target. It also makes it more flexible to add new additions, add dependencies and configure the source code before compilation. Cmake reads a file called CMakeLists.txt which may include other CMakeLists.txt in nested folders or other cmake configuration files. To configure cmake for a certain CMake file structure use the cmake -C [root folder] -B [build folder] -G Ninja where root folder contains the top most CMakeLists.txt file. Build folder destinates where it should generate cmake configuration files (and then further build the application). Then to build the application (compile) use the cmake --build [build folder] --target [target] where target sets which application to build.
¶ Ninja
Ninja is a requirement to be able to build the source code... Why?
¶ Design
¶ Folder structure
/ phobos-flight-computer

├── design               # Design description of the flight computer

├── fatfs                # Library for reading/writing to files within fatfs file structure

├── phobos-com           # Client application for wireless communication to flight computer

├── phobos-fc            # Flight computer library, with functionalities

│   └── lib

│       ├── include

│       └── src

├── phobos-launch        # The launch procedure for the rocket, with recovery system

│   └── app

├── phobos-static-test   # Test application of the rocket and reliablity of the flight computer

│   └── app

└── phobos-hal           # The hardware abstraction layer (HAL), generated by STM32CubeMX

    ├── cmake            # Cmake configuration files, helps with building code for the flight computer.

    ├── Core             # Files that can be changed if needed, but should be avoided

    │   ├── Inc

    │   └── Src

    └── Drivers          # Drivers for the flight computer, should not be altered.
¶ Overview
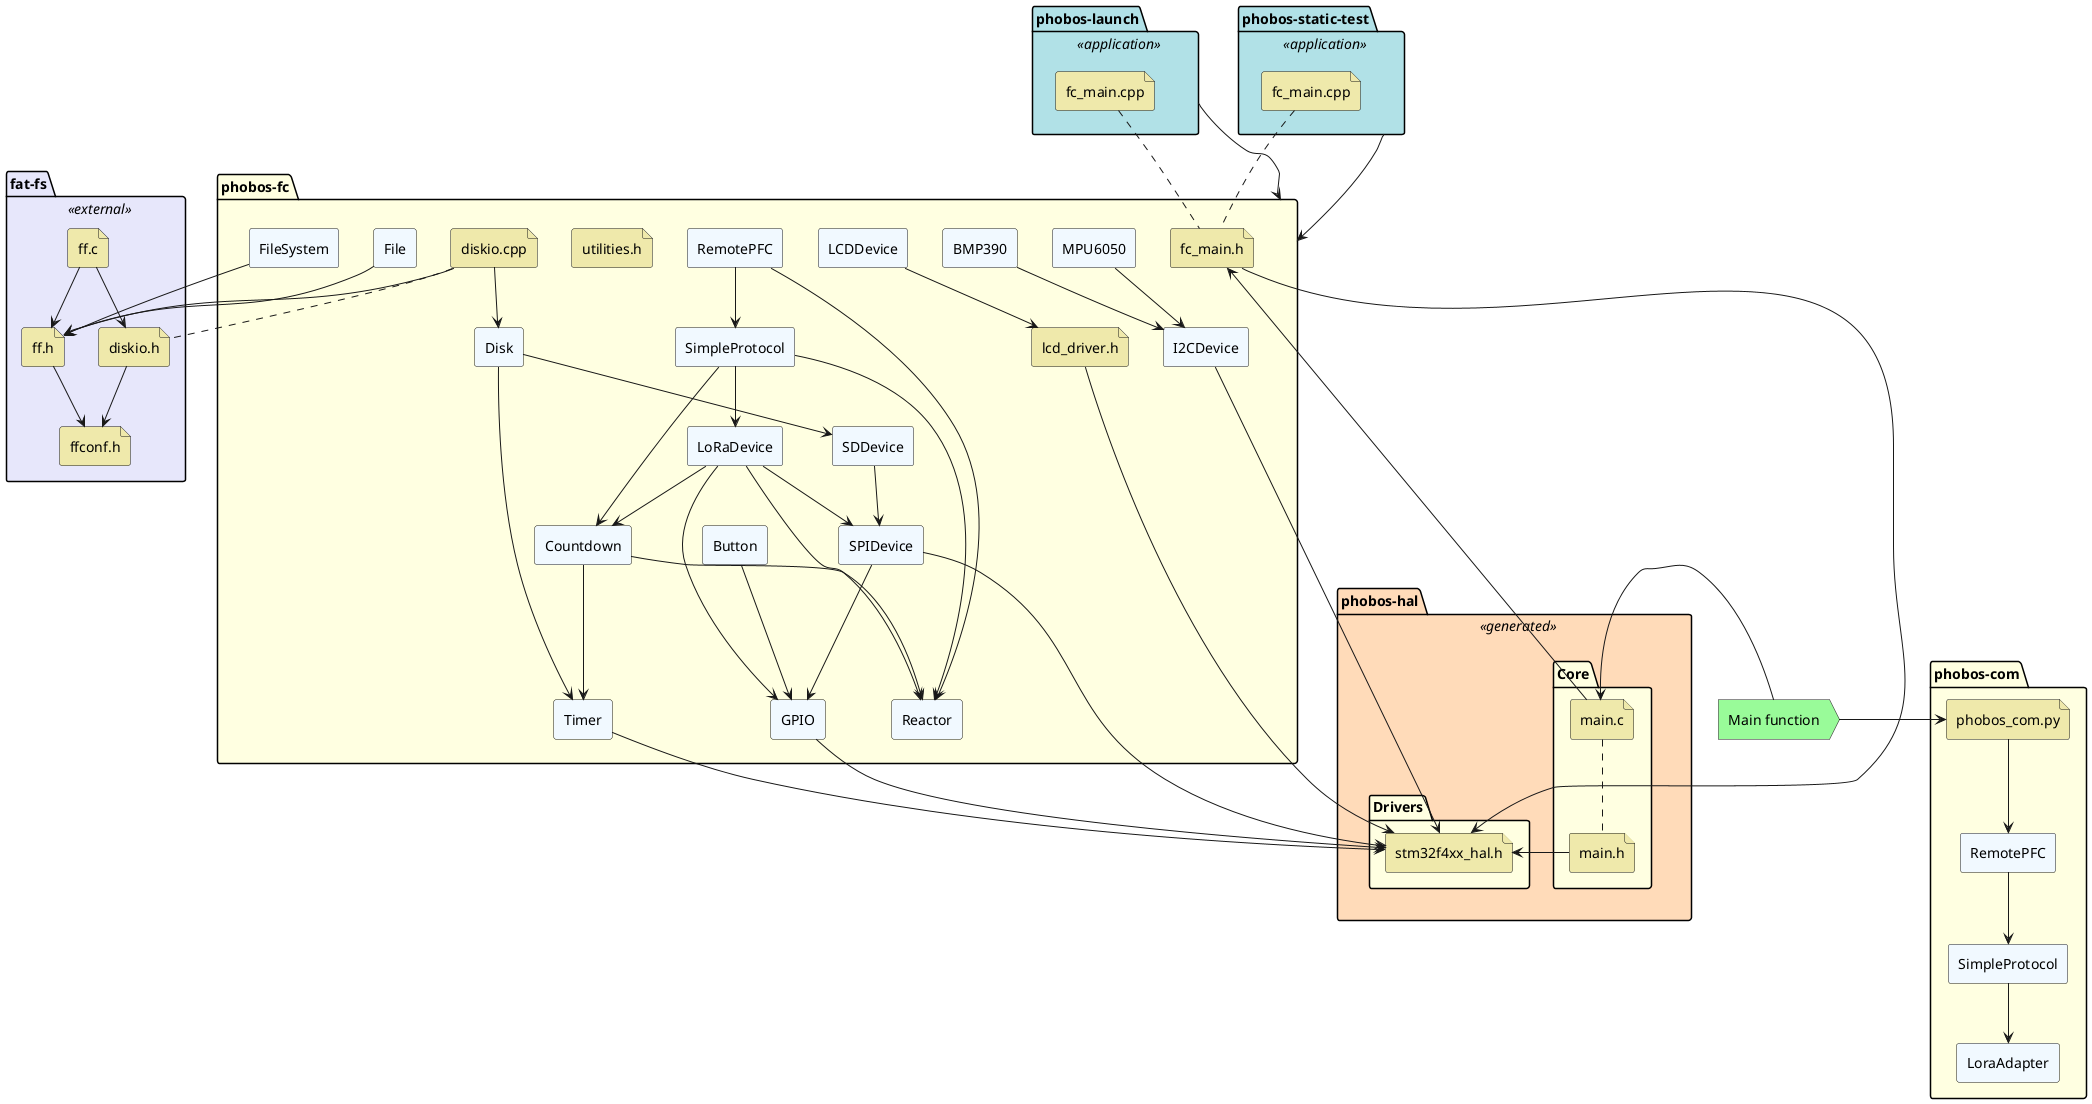
Class diagram showcasing an overview of the flight computer and its dependencies.
¶ Interaction
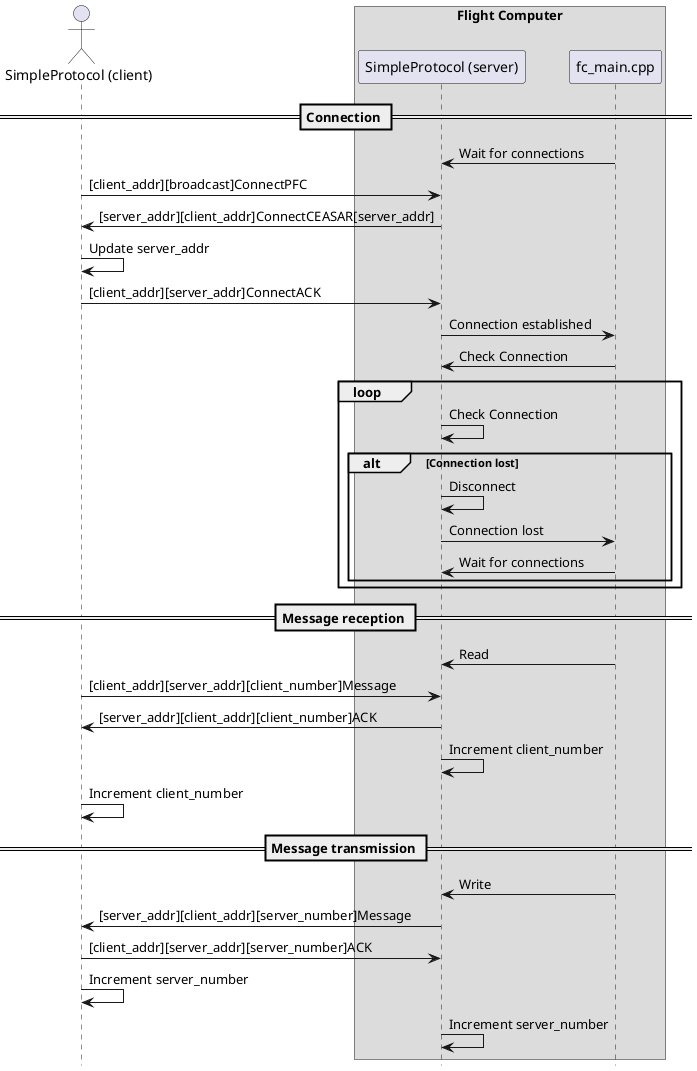
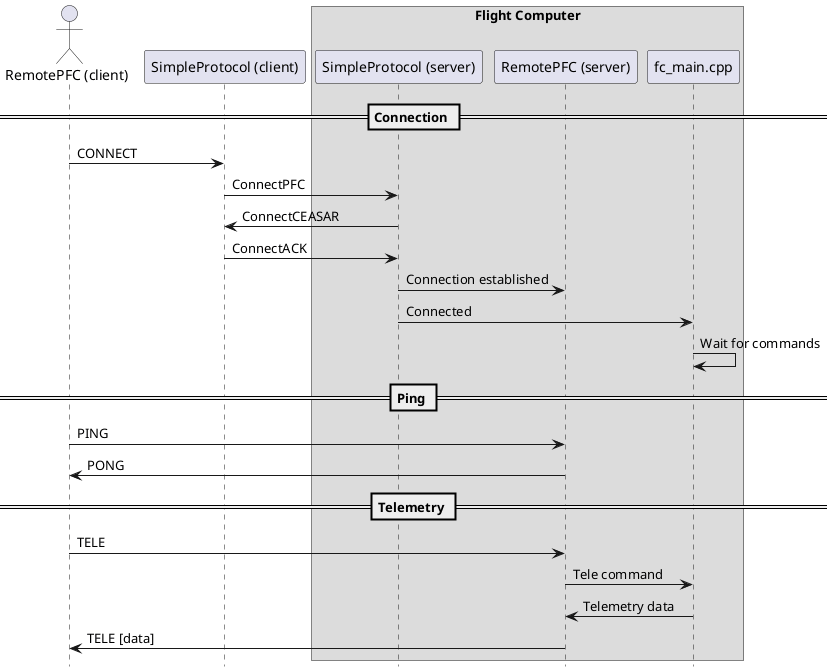
Sequence diagram for communicating between laptop and flight computer over RemotePFC.
Sequence diagram for communicating between laptop and flight computer over SimpleProtocol.